
REST란?
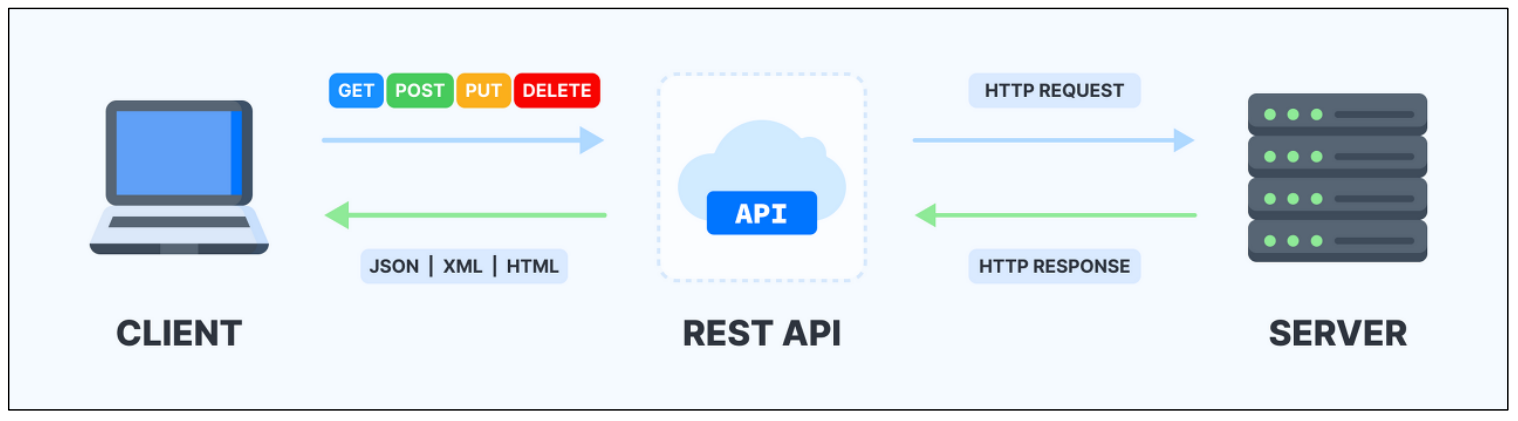
웹 서비스 디자인 아키텍처의 하나
“Representational State Transfer” 의 줄임말
URL을 기반으로 자원에 접근하고, 자원에 대한 CRUD(Create, Read, Update, Delete)를 지원하며, 이에 따른 결과를 JSON,XML 기반으로 정보 전달
- 자원(RESOURCE) - URI, URL
ex) movies/31, animal/dog/42, animal/cat?name=페르시안 - 행위(Verb) - HTTP METHOD (GET, POST, PUT, DELETE)
- 표현(Representations) – JSON, XML, HTML
Rest 설계 원칙
- 자원 기반
: 모든 데이터와 기능은 자원으로 표현되며, 각 자원은 고유한 URI(Uniform Resource Identifier)를 가집니다. - HTTP 메서드 사용
: 자원에 대한 작업은 HTTP 메서드로 수행됩니다.
• GET: 자원 조회
• POST: 자원 생성
• PUT: 자원 업데이트
• DELETE: 자원 삭제 - 무상태성
: 서버는 클라이언트의 상태를 저장하지 않습니다(각 요청은 독립적). 즉, 각 요청은 필요한 모든 정보를 포함해야 합니다.
이는 서버의 확장성을 높이고 클라이언트와 서버 간의 독립성을 유지합니다. - 캐시 가능
: 응답은 캐시 가능 여부를 명시해야 합니다.
클라이언트는 서버 응답을 캐시하여 불필요한 요청을 줄이고 성능을 향상시킬 수 있습니다. - 계층화된 시스템
: 클라이언트는 중간 서버(예: 프록시, 게이트웨이)를 통해 서버와 통신할 수 있습니다.
이는 보안과 로드 밸런싱 향상에 도움이 됩니다. - 일관된 인터페이스
: RESTful 시스템은 일관된 인터페이스를 제공하여 클라이언트와 서버 간 상호작용을 단순화합니다. 이로 인해 다양한 클라이언트가 동일한 API를 활용할 수 있습니다.
| 메소드 | URL | 설명 |
| GET (READ) | /movies | 리소스의 모든 목록을 가져오는 명령 |
| GET (READ) | /movies/:id | 특정 ID를 가지는 리소스를 가져오는 명령 |
| GET (READ) | /movies?name=스타워즈 | 쿼리 스트링을 지원하여 검색 기능을 지원하는 명령 |
| GET (READ) | /animal/cat, /animal/dog | 상위, 하위 리소스로 분리된 자원을 가져오는 명령 |
| POST (CREATE) | /movies | 새로운 리소스를 생성시키는 명령. 정상적으로 생성된 경우 등록된 ID를 포함한 모든 데이터를 반환함(GET 명령과 같음) |
| PUT/PATCH (UPDATE) | /movies/:id | 특정 ID를 가지는 리소스 정보를 업데이트하는 명령. 정상적으로 업데이트된 경우 리소스 정보를 반환 |
| DELETE (DELETE) | /movies/:id | 특정 ID를 가지는 리소스를 지우는 명령. 정상적으로 삭제된 경우 삭제된 리소스 정보를 반환 |
Rest 실습하기
✔ 라이브러리 설정 (build.gradle)
plugins {
  id 'java'
  id 'war'
}

group 'com.multi'
version '1.0-SNAPSHOT'

repositories {
  mavenCentral()
}

ext {
  junitVersion = '5.9.2'
  springVersion = '5.3.37'
}

sourceCompatibility = '17'
targetCompatibility = '17'

tasks.withType(JavaCompile) {
  options.encoding = 'UTF-8'
}

dependencies {
  // 스프링
  implementation 'org.springframework:spring-core:5.3.37'
  implementation "org.springframework:spring-context:5.3.37"
  implementation "org.springframework:spring-webmvc:5.3.37"
  implementation 'javax.inject:javax.inject:1'
  implementation 'org.springframework:spring-web:5.3.37'
  implementation 'org.springframework:spring-jdbc:5.3.37'

  // JOACKSON, JSON
  implementation 'com.fasterxml.jackson.core:jackson-databind:2.15.2' // Jackson 라이브러리 추가
  implementation 'com.googlecode.json-simple:json-simple:1.1.1'

  //mybatis
  implementation 'org.mybatis:mybatis:3.5.10'
  implementation 'org.mybatis:mybatis-spring:2.0.7'
  runtimeOnly 'mysql:mysql-connector-java:8.0.26'
  implementation 'org.apache.commons:commons-dbcp2:2.9.0'

  // AOP
  implementation 'org.aspectj:aspectjrt:1.9.20'
  implementation 'org.aspectj:aspectjweaver:1.9.20'

  // JSP, SERVLET, JSTL
  implementation('javax.servlet:javax.servlet-api:4.0.1')
  compileOnly 'javax.servlet.jsp:jsp-api:2.1'
  implementation 'javax.servlet:jstl:1.2'

  // Logging
  implementation 'org.slf4j:slf4j-api:1.7.32'
  runtimeOnly 'org.slf4j:jcl-over-slf4j:1.7.32'
  runtimeOnly 'org.slf4j:slf4j-log4j12:1.7.32'

  // Logback Classic
  implementation 'ch.qos.logback:logback-classic:1.2.11'
  implementation 'ch.qos.logback:logback-core:1.2.11'

  implementation 'commons-logging:commons-logging:1.2'

  // xml내 한글 처리
  implementation 'xerces:xercesImpl:2.12.2'

  compileOnly 'org.projectlombok:lombok:1.18.28'
  annotationProcessor 'org.projectlombok:lombok:1.18.28'

  testImplementation "org.springframework:spring-test:${springVersion}"
  testCompileOnly 'org.projectlombok:lombok:1.18.28'
  testAnnotationProcessor 'org.projectlombok:lombok:1.18.28'
  testImplementation("org.junit.jupiter:junit-jupiter-api:${junitVersion}")
  testRuntimeOnly("org.junit.jupiter:junit-jupiter-engine:${junitVersion}")
}

test {
  useJUnitPlatform()
}
📌 JSON이란 ?
데이터를 저장하고 전송하는데 사용되는 경량의 데이터 포맷으로, 키-값 쌍으로 표현
🔽 예시{"name": "홍길동", "age": 30, "isStudent": false}
📌 Jackson이란?
Java에서 JSON 데이터 형식을 처리하기 위한 라이브러리
✔ 데이터베이스 연결 및 생성
AppConfig.java
package com.multi.spring.spring_rest.config;

import org.apache.commons.dbcp2.BasicDataSource;
import org.apache.ibatis.session.SqlSessionFactory;
import org.mybatis.spring.SqlSessionFactoryBean;
import org.mybatis.spring.SqlSessionTemplate;
import org.springframework.context.annotation.Bean;
import org.springframework.context.annotation.Configuration;
import org.springframework.core.io.ClassPathResource;

import javax.sql.DataSource;

@Configuration
public class AppConfig {

    public AppConfig(){
        System.out.println("AppConfig created");
    }

    @Bean
    public DataSource dataSource() {
        BasicDataSource dataSource = new BasicDataSource();
        dataSource.setDriverClassName("com.mysql.cj.jdbc.Driver");
        //
        dataSource.setUrl("jdbc:mysql://localhost:3306/shop2?useSSL=false&allowPublicKeyRetrieval=true&serverTimezone=UTC&characterEncoding=UTF-8&useUnicode=true");
        dataSource.setUsername("root"); // 자신에 맞게 수정
        dataSource.setPassword("1234"); // 자신에 맞게 수정
        dataSource.setInitialSize(5); // 초기 커넥션 수
        dataSource.setMaxTotal(10); // 최대 커넥션 수
        return dataSource;
    }

    @Bean
    public SqlSessionFactory sqlSessionFactory(DataSource dataSource) throws Exception {
        SqlSessionFactoryBean sessionFactory = new SqlSessionFactoryBean();
        sessionFactory.setDataSource(dataSource);
        sessionFactory.setConfigLocation(new ClassPathResource("mybatis-config.xml"));
        return sessionFactory.getObject();
    }

    @Bean
    public SqlSessionTemplate sqlSessionTemplate(SqlSessionFactory sqlSessionFactory) {
        return new SqlSessionTemplate(sqlSessionFactory);
    }
}
- myBatis와 mysql을 사용하였다 !
- 조심해야할 것은 setUsername과 setPassword 부분을 초기 설정한 데이터베이스 정보로 입력해주어야 한다 .

- 우리는 tour 테이블을 사용할 것이다 .
💡 이 외에도 여러 config 파일이 존재하지만, 오늘은 주요 로직만 살펴보기 위해 생략한다. 궁금하신 분들은 아래 github 주소를 확인해주세요 😊
✔ TourVO (도메인)
package com.multi.spring2.tour.domain;

import lombok.AllArgsConstructor;
import lombok.Data;
import lombok.NoArgsConstructor;

@Data
@AllArgsConstructor
@NoArgsConstructor
public class TourVO {
    private String destination;
    private int duration; // in days
    private double price;
}
→ 우리는 destination과 duration, price를 TourVO로 가져올 것이라 TourVO에서 정의해줬다 !
✔ TourDAO (dao) 와 TourMapper(mapper)
// TourDAO.java
@Repository
@Slf4j
public class TourDAO {

    //private static final Logger logger = LoggerFactory.getLogger(MemberDAO.class);
    private final SqlSessionTemplate sqlSessionTemplate;

    @Autowired
    public TourDAO(SqlSessionTemplate sqlSessionTemplate) {
        this.sqlSessionTemplate = sqlSessionTemplate;
    }

    public List<TourVO> all() {
        return sqlSessionTemplate.getMapper(TourMapper.class).all();
    }
}
// TourMapper.interface
@Mapper
public interface TourMapper {
    List<TourVO> all();
}
- TourMapper 인터페이스의 all() 메서드를 호출하여 모든 여행 정보를 데이터베이스에서 가져올 것이다.
- List<TourVO> 형태로 결과를 반환한다
✔ TourController
package com.multi.spring2.tour.controller;

import java.util.List;

@Controller
@RequestMapping("/tour2")
public class TourController {

    private final TourService tourService;

    @Autowired
    public TourController(TourService tourService) {
        this.tourService = tourService;
    }

    @GetMapping("")
    public ModelAndView tour(ModelAndView mav) {
        mav.setViewName("/tour2/tour2");
        return mav;
    }

    @GetMapping("/json3")
    @ResponseBody
    public List<TourVO> getTours2() {
        return tourService.all();
    }
}
- 가장 많이 헤맸던 부분이다 >"<
- @RequestMapping 을 통해 http://localhost:8080/tour2 에 매핑한다.
- ModelAndView 를 통해 http://localhost:8080/tour2 url에 현재 webapp/WEB-INF/views/tour2/tour2.jsp 파일과 연결 시켜준다.
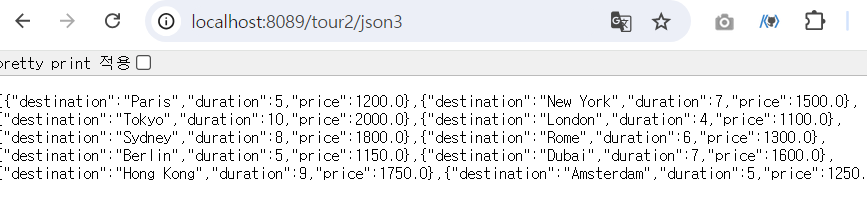
- http://localhost:8080/tour2/json3 에는 List<TourVO> 형태로, json 파일이 들어올 것이다 --> TourService코드를 확인해야 알겠지만, 현재 json 파일은 다음과 같이 들어온다 .
- getTours2(): /tour2/json3 경로에 대한 GET 요청을 처리하여 모든 여행 정보를 JSON 형식으로 반환.
✔ TourService
package com.multi.spring2.tour.service;

@Service
@Slf4j
public class TourService {

    private TourDAO tourDAO;

    @Autowired
    public TourService(TourDAO tourDAO) {
        this.tourDAO = tourDAO;
    }

    public List<TourVO> all() {
        log.debug("--->> ");
        return tourDAO.all();
    }
}
✔ View 코드
<!--메인코드-->
<%@ page contentType="text/html; charset=UTF-8" pageEncoding="UTF-8" %>
<!DOCTYPE html>
<html>
<head>
    <title>Spring</title>
    <link rel="stylesheet" href="resources/css/out.css">
</head>
<body>
<br/>
<div style="background: lemonchiffon; text-align: center">
    <a href="tour2">
        <button>투어 정보 처리</button>
    </a>
</div>
</body>
</html>
<%@ page contentType="text/html;charset=UTF-8" language="java" %>
<html>
<head>
    <meta charset="UTF-8">
    <meta name="viewport" content="width=device-width, initial-scale=1.0">
    <title>Axios Example</title>
    <!-- Bootstrap 5 CSS -->
    <link href="https://cdn.jsdelivr.net/npm/bootstrap@5.1.3/dist/css/bootstrap.min.css" rel="stylesheet">
    <!-- Bootstrap Icons CSS -->
    <link href="https://cdn.jsdelivr.net/npm/bootstrap-icons/font/bootstrap-icons.css" rel="stylesheet">
    <script src="https://cdn.jsdelivr.net/npm/axios/dist/axios.min.js"></script>
</head>
<body>
<button id="b1" class="btn btn-primary">여행 json 리스트 가져오기</button>
<div class="container mt-5">
    <div id="result" class="row"></div>
</div>
<script>
    document.getElementById('b1').addEventListener('click', function() {
        // Axios로 JSON 데이터를 호출
        axios.get('/tour2/json3')
            .then(function (response) {
                // 데이터를 받아서 result div에 테이블 형태로 출력
                var tours = response.data;
                var resultDiv = document.getElementById('result');

                // 기존 내용을 지우기
                resultDiv.innerHTML = '';

                var table = document.createElement('table');
                table.className = 'table table-striped';

                var thead = document.createElement('thead');
                thead.innerHTML = '<tr>' +
                    '<th scope="col">#</th>' +
                    '<th scope="col">Destination</th>' +
                    '<th scope="col">Duration</th>' +
                    '<th scope="col">Price</th>' +
                    '</tr>';
                table.appendChild(thead);

                var tbody = document.createElement('tbody');
                tours.forEach(function(tour, index) {
                    var row = document.createElement('tr');
                    row.innerHTML = '<th scope="row">' + (index + 1) + '</th>' +
                        '<td><i class="bi bi-geo-alt-fill me-2"></i>' + tour.destination + '</td>' +
                        '<td>' + tour.duration + ' days</td>' +
                        '<td>$' + tour.price + '</td>';
                    tbody.appendChild(row);
                });
                table.appendChild(tbody);

                resultDiv.appendChild(table);
            })
            .catch(function (error) {
                console.error('Error fetching the tours:', error);
            });
    });
</script>
</body>
</html>- 현재 axios로 JSON 데이터를 호출한다.
- axios.get('/tour2/json3') : 아까 확인했던 http://localhost:8089/tour2/json3 에 존재하는 json 파일을 자바 스크립트로 뿌려주는 코드이다
-> 백엔드 컴포넌트가 주제임으로 JSP에 관한 코드 내용은 생략한다.
- axios.get('/tour2/json3') : 아까 확인했던 http://localhost:8089/tour2/json3 에 존재하는 json 파일을 자바 스크립트로 뿌려주는 코드이다
View 주요 코드뜯어보기
<body>
<button id="b1" class="btn btn-primary">여행 json 리스트 가져오기</button>
<script>
document.getElementById('b1').addEventListener('click', function() {
axios.get('/tour2/json3')
.then(function (response) {
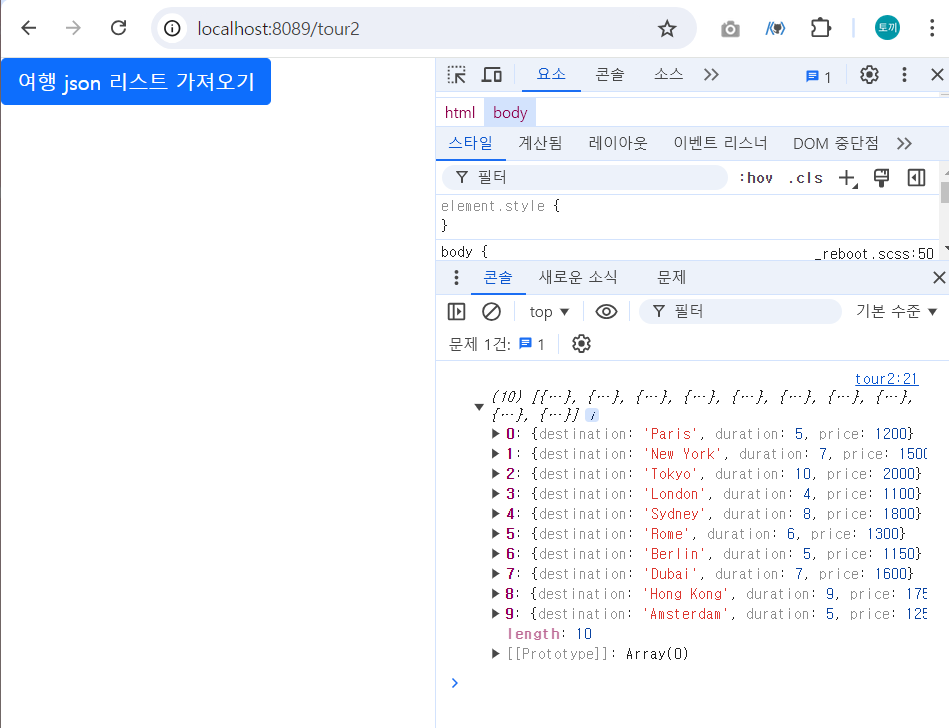
var tours = response.data;
console.log(tours);
// 기존 내용을 지우기
.catch(function (error) {
console.error('Error fetching the tours:', error);
});
});
</script>
</body>
→ 이해하기 쉽게 JSON를 받아오는 프론트엔드 부분을 뜯어 보자면 !
- 현재 버튼의 id 속성은 “b1” 으로 설정되어있다.
- document.getElementById('b1').addEventListener('click', function() { ... });
- "b1" ID를 가진 버튼에 클릭 이벤트 리스너를 추가한다. 즉, 사용자가 버튼을 클릭하면 내부의 함수가 실행된다.
- axios.get('/tour2/json3')
- axios라이브러리를 사용하여 /tour2/json3 URL로 GET 요청을 보낸다.
- response.data에 원하는 json3파일이 잘 담겨온 것을 알 수 있다 .
Axios 에러 발생 ❗❗
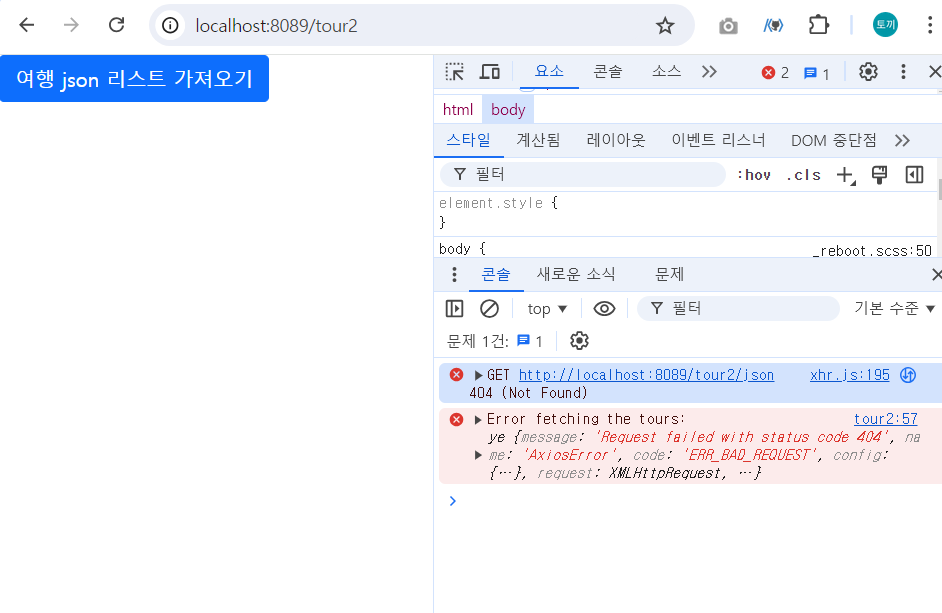
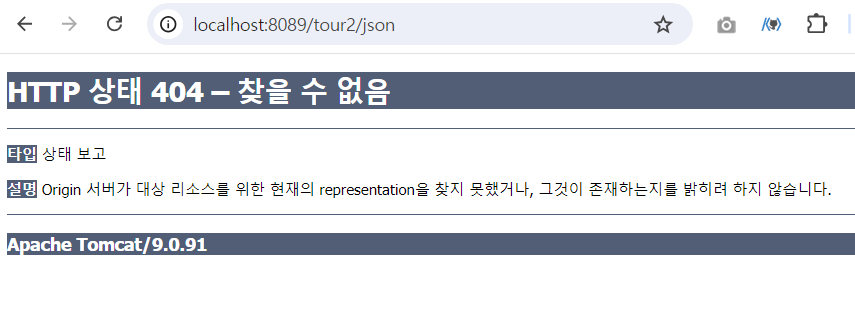
- 우리가 자주보는 AxiosError이다 →
개발자는 오류코드를 잘 보는 능력이 반이라고 생각한다 .. - Not Found , 현재 tour2/json에 제대로 데이터가 전달되고 있지 않아 발생한 코드이다. 경로 설정에 유의하자
✔ 최종 실습 성공 화면 !
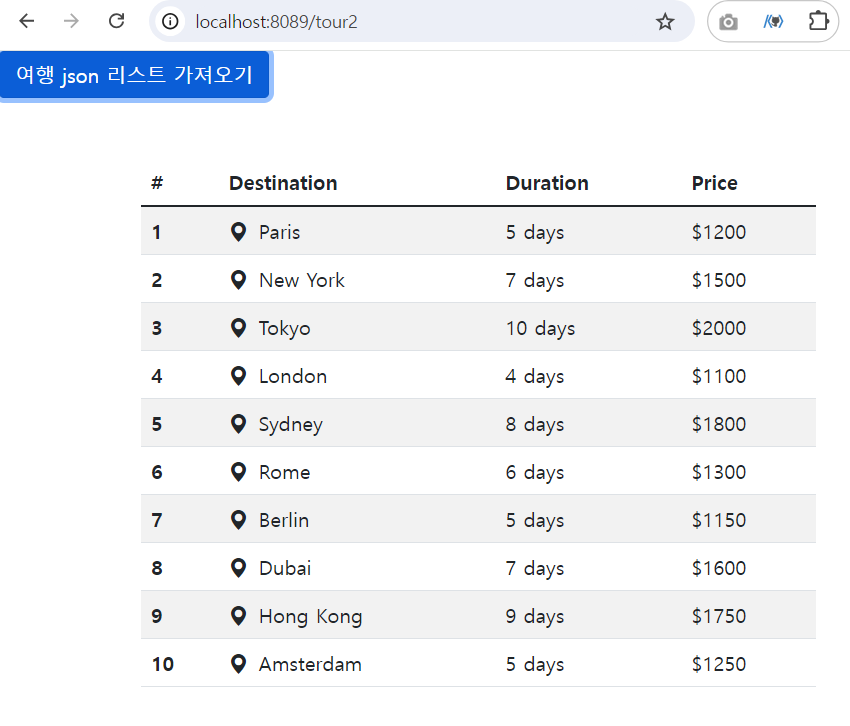
현재 JSON 코드가 화면으로 잘 뿌려지는 것을 볼 수 있다 😊
💡느낀점
스프링을 구현하며 가장 어려운 점은 환경설정부분같다 ,,
오늘도 데이터베이스와 스프링을 연동하는 과정이 가장 어렵게 느껴졌다 !
axios를 통한 통신을 프론트엔드에서만 구현해보았기에 데이터를 뿌려주기 위한 백엔드 코드를 작성하며, 조금씩 로직을 이해해나가는 중이다 !! 이번주도 아자아자 화이팅 !!
🗂실습코드
https://github.com/mimmmji/spring_rest/tree/main
GitHub - mimmmji/spring_rest: Spring과 myBatis, JSP를 이용한 restful API 구현
Spring과 myBatis, JSP를 이용한 restful API 구현. Contribute to mimmmji/spring_rest development by creating an account on GitHub.
github.com

'[KB IT's Your Life] Today I Learnd' 카테고리의 다른 글
| [KB IT's Your Life] 7주차 컴포넌트 백엔드: Spring Security💡 (4) | 2024.09.11 |
|---|---|
| [KB IT's Your Life] 6주차 컴포넌트 백엔드: 게시판 만들기💡 (3) | 2024.09.02 |
| [KB IT's Your Life] 4주차 컴포넌트 백엔드: MyBatis실습 프로젝트💡 (0) | 2024.08.18 |
| [KB IT's Your Life] 3주차 컴포넌트 백엔드2 💡 (6) | 2024.08.12 |
| [KB IT's Your Life] 2주차 컴포넌트 백엔드 💡 (2) | 2024.08.03 |